Category Archives: Plumbing

thePlumber.com has a new look!

As you know, we’re just crazy about anything having to do with plumbing – and thePlumber.com is one of our favorite plumbing-related websites! The team over at thePlumber.com has recently revitalized and updated their site and we’re excited to share their amazing transformation with you. Just click the image below to go check out their newly rejuvenated website – where you can find the latest plumbing news, plumbing product recall information, and everything you ever wanted to know (and maybe some stuff you didn’t) about plumbing history!

Finding Mansfield Toilet Repair Parts

Mansfield Plumbing has been making toilets for a long time and there’s a reason why they’re still around. From classic to modern designs and everything in between, all offering quality water-efficient performance, Mansfield toilets are definitely worth keeping. So what do you do when your high performing Mansfield toilet stops performing so well? You repair it, of course!

Mansfield Magnum Toilet
Mansfield Alto Toilet
Mansfield Enso Toilet

The first step in fixing your toilet is finding out what’s actually wrong with it – and luckily for you, we’ve got a handy guide to troubleshooting your toilet. Once you’ve figured out what’s wrong, you’ll need to find the right parts to fix the problem. Sometimes this is easy, sometimes it’s not so easy, but with a little investigative work and the help of your friends at PlumbingSupply.com®, hopefully it won’t be that difficult.

Start by trying to find your toilet model number. Grab a flashlight, CAREFULLY remove the tank lid (and place it somewhere safe and out of the way), and look around inside the tank for a model number. Older Mansfield toilet model numbers are typically three digits long – most of which start with a “1” for two-piece toilets or a “7” for one-piece toilets. Newer, more water-efficient toilets are generally four digits long and most begin with a “3”.

Usually the model number will be stamped onto the back wall or side of the toilet tank, along with “Mansfield” and a gpf (gallons per flush) rating. Don’t ignore the gpf rating! As toilet regulations and water-efficiency standards have changed over the years, Mansfield has taken a somewhat different approach than some other toilet manufacturers in remaining compliant with regulations. Rather than discontinuing and replacing many of their toilet designs, they have simply re-designed the way some of their existing models flush. Thus, you could have an Alto Series toilet with a 3.5gpf, 1.6gpf or 1.28gpf rating. They may look the same on the outside, but the way they work on the inside can be drastically different.

mansfield-toilet-model-number

It’s important to note at this point, that any toilet that flushes well is holistically designed – meaning the amount of water, the flush mechanism, the way the water is delivered, the trapway, etc. (essentially the entire toilet) has been designed to work as a complete unit. What this means for you, as the owner and/or fixer of the toilet, is that in order for your Mansfield toilet to continue to flush well you need to make sure you’re getting the parts that are appropriate for your toilet’s gpf rating. You simply can’t put a flush valve that delivers 1.6gpf in a 3.5gpf toilet and expect it to work well.

So once you’ve found your toilet model number and your gpf rating, what’s next? Finding parts. We have a complete Mansfield toilet repair parts listing to help you out – just find your toilet model number, click on it, and see the parts you’ll need to fix your toilet. This listing can also be helpful if for some reason you can’t find your model number. Browse the available pictures of Mansfield toilets until you find the one that looks like what you have, then again click to see your parts.

Mansfield Toilet Flush Valves

One thing that may confuse some people at this point (especially those who have some previous experience with toilet repair), is that certain Mansfield parts are highly unique. Most notably, their flush valves. While some models may use the traditional flapper valve, others use a kind of canister-style valve. These valves use the same trip levers as their flapper-using counterparts, but the entire top of the valve is lifted up and the water flows in from all sides. Usually, if you have a toilet leak with this type of valve, you simply need to replace the seal around the valve opening. So if you look into your toilet and see something that looks like this – don’t panic!

This uniqueness of parts can actually be very helpful for those who can’t find a model number for their Mansfield toilet. If you look into your toilet and see one of the unique canister flush valves but no model number, your next step is to pull out a tape measure. Since the canister flush valves only come in three types – 3.5gpf, 1.6gpf, and dual flush (which are distinctly different from the other two) – it is fairly easy to determine which style you need, then measure your existing valve or the inside of your tank to figure out what height you need. It’s the same with trip levers, just measure to determine the length you need and then compare angles to make sure it will reach the flush valve or flapper chain.

While finding replacement parts for Mansfield toilets can be somewhat easier than with other brands, we’re always happy to help if you are confused or unsure about which parts you need. Simply contact one of our customer service representatives and we’ll do everything we can to make sure you’re getting what you need to fix your Mansfield toilet!

Finding Universal Rundle Toilet Parts

Universal Rundle toilets are some of the best out there in terms of balancing performance and water usage. Pioneers in their industry, Universal Rundle (UR) was making water efficient 1.6gpf toilets that actually worked well long before water conservation efforts made it mandatory. Add to that some of their truly unique styles and a variety of designer colors and many homeowners would much rather repair than replace their old UR toilet. However, finding toilet model numbers so you can find the right parts can be tricky business – especially with this particular brand.

Universal Rundle unique tank lid Adara toilet
Universal Rundle one-piece Bordeau toilet in green
Universal Rundle gray Atlas toilet

As always, the place to start is inside the tank. So grab a flashlight and go exploring. Exercise caution when removing the tank lid, as it is fragile and can be easily broken if stepped on or dropped. Inside your tank on the back wall of the tank or sometimes in the very bottom of the tank, you will see a model number stamped or painted on the porcelain.

Typically, for Universal Rundle toilets, you will see a four-digit number starting with a ‘4’. There may be more numbers indicating specific features, or – this is where it can get confusing – more than one model number. Elsewhere in your toilet tank, you should find a date stamp that will tell you when the toilet was manufactured. This can be important because once Universal Rundle was bought by Crane and became Universal Rundle Crane (URC), many of the internal components changed. For example, a Saturn 4012 made in 1987 may use very different components than a Saturn 4012 made in 1992.

Another problem unique to Universal Rundle toilets is that some newer series of toilets re-used a model number from an older series of toilets. The Astoria toilet made after 1995, for instance, has a model number 4470 – the same number that was used for the New Venus series toilets in the 1970s and ’80s. Additionally, be aware that not all tanks may have a model number or date stamp, and sometimes the model number can be difficult to find. In other instances, you may have multiple numbers in various locations.

Finding your UR model number isn't always easy

In these situations, try to compare as much information as you have available with the pictures, parts diagrams, and model numbers we’ve provided to help you find the right parts. If you can find your model number and pretty good idea of what you need, all that’s left is purchasing the parts, but as with most things in life, sometimes it just isn’t that easy.

Please keep in mind that sometimes you simply may not be able to determine your toilet model number and may need to purchase “will fit” replacement parts. If this is the case, we recommend snapping a picture or two of the internal toilet components and grabbing a tape measure. If you’re replacing a fill valve or flush valve, measure from the bottom of the tank to the top of the valve and note that height. There are a variety of “will fit” valves that could potentially work for you, but first you’ll need to be sure it will fit inside your tank at roughly the same water level. Flappers are much easier to replace, as there are so many generic varieties, but trip levers will also need to be measured to ensure the arm is long enough and angled properly so things will flush properly.

Even if you have your model number and aren’t looking for “will fit” parts, it is important to remember that Universal Rundle and Universal Rundle Crane have been out of business for quite a while now, so many of the original parts have been discontinued. Sometimes we are able to offer you OEM repair parts as a replacement, but there are other times where a “will fit” is the only option simply because nobody makes a part exactly like the original anymore.

Now you know pretty much everything we know about finding Universal Rundle replacement toilet parts, but if you’re still confused or need help, please feel free to contact us and one of our top-notch customer service representatives will be happy to help you find what you need. And if you’ve got your parts, but need a little help installing your new Universal Rundle toilet parts, check out our Guide to Toilet Repair for video tutorials, FAQs and answers, troubleshooting help, and more!

PlumbingSupply.com has a new design!

Whether you’re an old pal or a newly minted friend, we invite you to come check out our updated website. We know you love our extensive inventory and exceptional customer-focused service, so now we’re extending that customer focus even further by making it easier than ever for you to find what you need, whether you’re sitting at your desk or on-the-go with a busy plumbing project, and our new streamlined shopping cart will get you quickly on your way – with the same rock-solid security you’ve come to rely upon when you shop with us. Please stop on by to take a look and let us know what you think. Thank you from all of your friends at PlumbingSupply.com!

Finding Toto Toilet Parts

Ask around, and you’ll find that people love Toto toilets – with good reason. They’re some of the most efficient, low-maintenance, low flow toilets around, and they come in a variety of styles to suit many types of bathroom decor. However, as with anything that has moving parts, sooner or later something is going to break or wear out and need replacing. So what do you do?

If you purchased the toilet, you may still have the original paperwork lying around somewhere that can tell you all the replacement parts you could ever need. If you lost or misplaced your paperwork or you aren’t the original purchaser of the toilet, though, there’s still hope. Toilet manufacturers are human too and to help us out, Toto prints the toilet model number into each of their toilet tanks.

To find your model number, all you need to do is carefully remove your toilet tank lid (be sure to set it somewhere safe so it can’t get broken while you’re investigating!) and grab a flashlight. Look around on the inside of your tank and try to find some numbers painted above or near the water line on the back or sides of the tank. You may find two or three different sets of numbers, so be sure to write them all down to help you with your search for parts.

toto-onepiece-toilet If you have a Toto one-piece toilet, your model will most likely start with the letters “MS” followed by six numbers – ending with either a “113” (for round toilet bowls) or a “114” (for elongated toilet bowls). Knowing whether you have a round or elongated bowl can come in handy if you need a replacement toilet seat, but what you really want to focus on are the three numbers between the “MS” and the “113/114” as these will be the main identifying model number of your toilet.

For example, if your toilet says “MS863113E”, you’ll want to look for parts for a one-piece model “863” – BUT WAIT! Let’s not overlook that little “E” on the end! If your model number ends with an “E” your toilet is an “Eco” model that uses the E-Max® flushing system. “Eco” models may require different parts than older or standard flush models that don’t have the “E”, so be sure to look carefully at parts diagrams and product descriptions to make sure you’re buying the right parts for your system. While the older flappers, valves, etc. might fit into the toilet, you certainly won’t get the same low consumption performance if you use those parts.

If you have a two-piece toilet, you’ll need to make sure you keep an eye out for that “E” as well, but your model will most likely begin with “ST” and be followed by only three numbers. If you have any original documentation left, you might notice that two-piece Toto toilets actually have three identifying numbers – one for the tank, one for the bowl, and one that combines the two. Chances are that you will only be able to locate the tank number (the one beginning with “ST”) on your actual toilet, but that’s okay because it’s really the only one you need.

toto-twopiece-toilet Be aware that there may be other letters after your model number besides that “E”, but most of these aren’t important. One notable exception is the letter “R”, which means you have a right-hand trip lever (which we’re betting you were already aware of…). If you see a “G”, your toilet has a SanaGloss finish for easy cleaning, and if your two-piece tank number is followed by an “S”, that just means you have a standard toilet rather than an “Eco” model that only uses 1.28 gallons of water per flush. However, on a quick side note, one of the best things about Toto toilets is that even their standard models only use 1.6 gallons of water per flush, making them much more environmentally friendly than many older toilets.

Okay, so now that you’ve found your toilet model number and learned more than you probably ever wanted to know about Toto’s model number system, let’s move on to finding the actual replacement parts you may need. Take your model number and head over to our Toto toilet parts index. There you’ll find pictures of Toto toilets along with model numbers. Just click on your model number and you’ll be taken to page that lists all the repair parts for that particular Toto toilet. Order the ones you need and just sit back and relax. We stock a ton of Toto toilet parts, and if you order before 4:30pm PST on a weekday, we’ll ship your parts out that same day.

Now, we can hear some of you saying right about now, “But what do I do if I can’t find my model number???” Don’t panic. It might require a bit more legwork, but there are still a couple of ways to figure out which replacement parts you need even if you can’t find your Toto toilet model number. One of the things many people enjoy about Toto toilets is their range of distinctive styles. While there may be a couple of similar-looking toilets, we’re confident most people can find their toilet by looking at our Toto toilet picture index. Once you see your toilet, just click on it and you’ll be directed to parts for that model.

toto-toilet-flapper

If for some reason you can’t find your Toto toilet using our picture index, take a pen, paper, and a ruler or measuring tape into the bathroom and measure whichever components you may need to replace. If you’re measuring for a trip lever, note the length of the arm. For fill valves and flush valves, measure from the bottom of the toilet tank to the top of the valve and note this. Be sure to measure the diameter of your flush valve as well. The majority of Toto toilets use a 3” flush valve, which is part of what makes them so efficient with so little water – the water is dumped into the bowl faster and provides a stronger flush with less water – but there are a few older models that use a 2” flush valve, and some models will use a flush valve with a counterbalance flapper. If you have one of these, you’ll know straightaway as they are very distinctive-looking. Another thing you’ll need to note is how the flush valve is installed. Some may use square-ish mounting hardware while others have a simple threaded locknut to secure them.

Take your measurements and start looking through our selection of Toto toilet repair parts. Chances are, you’ll find a match for what you need, but if you can’t find what you’re looking for one of our exceptional customer service representatives will be happy to help you.

Need help with installing your new Toto toilet parts? Check out our Complete Guide to Toilet Repair for video tutorials, FAQs and answers, troubleshooting help, and more!

To Filter or Not To Filter?

One question we get asked a lot is – do I need to filter my tap water? And unfortunately, the answer is always – it depends. There are a number of different reasons why you may or may not want to filter your tap water, as well as a variety of different ways to do so.

The main reason people tend to ask this question is because they’ve heard something in the news or online or from a friend or wherever that says drinking regular old tap water is unsafe or bad for your health. While we here at PlumbingSupply.com® are not doctors, we do know that all drinking water supplied by a municipality in the United States is regulated by the EPA for safety and is considered healthful and safe for the majority of people. That doesn’t mean, however, that there aren’t reasons to filter your water – including taste or odor, sand/sediment, and individual lifestyle or health concerns.

The EPA regulates the amount of certain minerals, chemicals, bacteria, and other microorganisms that can be present in our drinking water to ensure not only that harmful things are kept in check, but also to help provide optimal levels of healthful things like magnesium and fluoride. These levels are frequently tested and your water municipality must notify you within 24 hours if there is some kind of problem and your water is either unsafe to drink or may cause a health issue. It is important to note, though, that certain chemicals and compounds that may be present in drinking water are not regulated or tested for a variety of reasons – and we are still uncertain of the long-term effects things like leftover pharmaceuticals in our drinking water may have on our health.

Additionally, it is important to understand that water quality is very complex and can vary from town to town, from neighborhood to neighborhood, and even from house to house on the same street depending on several different factors, including the initial source quality, treatment methods, and municipal and home plumbing systems. For example, your home might have a different type of plumbing system or an older plumbing system than your neighbor’s, which can sometimes affect the taste, odor, or other qualities of the water.

The very first step in deciding whether you should filter your water or not is to know the quality of your water source. Those who receive municipal water can request a water quality report from their water company. Many municipalities offer an online download so you can look it up any time, or you can ask for a paper copy to be mailed to you. The report should tell you things like the methods used to treat the water, the general hardness of the water, and overall levels of certain chemicals, minerals, and microorganisms. If you’re on a well, we recommend having your water tested by a professional. Your local city authorities or municipal water company will usually have a list of water quality professionals you can contact.

countertop-filter If the overall quality of your water is acceptable, but you simply don’t like the taste or odor, we recommend installing a countertop carbon filter for drinking. Carbon filters will usually clear up taste and odor issues for a relatively low cost. Countertop models attach easily to the existing water supply under your sink and can be moved with you – a bonus if you rent. If you’re worried about chlorine or lead, most carbon filters will also remove these elements. We also offer filtered shower heads that can help remove chlorine and may be helpful to people who are concerned about the health effects of breathing in chlorine.

If you’re concerned about fluoride, we recommend first determining how much fluoride is in your drinking water and how it got there, and then discussing your personal fluoride needs with your dentist. Fluoride naturally occurs in many drinking water sources, and is beneficial to our dental health. If it is present in appropriate amounts, your local municipality may not add fluoride to the water or may even remove some of the naturally present fluoride if levels are too high. Note that carbon filters won’t remove fluoride and you may need a more involved filtering system, like a reverse osmosis system if you want to get rid of it.

lakos-sediment-filter Sometimes your water can pick up sediment somewhere between the water treatment plant and your faucet, but the biological quality of the water is still good. In these cases, you may just need a simple sand separator to solve the problem.

If the overall quality of your city tap water isn’t what you would like it to be, you have well water, or you have certain medical conditions, you may need to filter your water. However, before you choose a filtration system, we recommend consulting a professional to help you figure out what should be removed and what should be kept. Once you’ve decided what your filtering needs are, check out our super awesome Water Filter Buying Guide to help you evaluate your options and choose the best filtration system for you.

Now it’s your turn – do you filter your tap water? Why or why not?

Top 5 Culprits of Home Flooding

Home flooding sucks. There’s just no two ways about it. You may lose your home or valuable possessions, certain types of water damage may not be covered by your homeowner’s or renter’s insurance, the costs for cleanup are often exorbitant and if the damage was due to a burst pipe or faulty appliance you are also liable for the water bill, and it can take months to
restore the damaged parts of your home and you may not even be able to remain in your home during cleanup or restoration if mold or other health concerns are a factor.

Before you fall into the depths of despair, though, there is good news – many of the top five causes of home flooding or home water damage are preventable! Let’s explore the main
culprits behind home floods and what you can do to help prevent or mitigate them.

1. Natural flooding

One of the most common and easily recognizable causes of home flooding is nature. Heavy rains can cause rivers to overflow, wastewater systems to become overwhelmed, and urbanized areas to fill up with water very quickly. Tsunamis, earthquakes, tornadoes, hurricanes, and other weather phenomenon are often accompanied by heavy rains or can cause substantial damage to dams, levees, or municipal plumbing systems and wreak havoc on an entire city or region. Unfortunately, there isn’t a lot you can do to prevent water damage to your home from these causes aside from making sure your home has been built above the base flood elevation with a good foundation, ensuring you have a working pump, and taking emergency measures in the event of a storm.

2. Drainage problems

toilet-backup

Drainage problems can be related to storms or other weather phenomenon – for example, overwhelmed
municipal water lines backing up into your home – but are more often related to poorly maintained drains in and around the home. If your main line has a clog, wastewater can back up and flood the house through toilets, sinks,
showers, and floor drains. Typically, these are smaller floods affecting only one area of the home like the bathroom or basement, but if left unchecked for a long period of time there can be substantial damage.

However, you can take steps to help prevent drainage problems in your home by making sure to keep sink, toilet, shower, gutters and other drains clear of common clog-causing substances or debris, installing backwater valves, and having your home’s drainage system regularly
inspected every few years by a licensed plumber to ensure there are no problems.

Learn more about how to prevent clogged drains

3. Appliances

waterheater-flood

Faulty appliances or their connections to your plumbing
system are notorious for causing home floods. Some basic appliances use large volumes of water and if a supply line bursts or the shut-off mechanism fails, all that water has nowhere to go but onto your floors and through your home. The most common culprits for appliance-related water damage are washing machines, water heaters, dishwashers, and refrigerators.

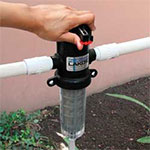
Fortunately, appliance-related water damage is fairly easy to prevent with modern devices like FloodStops and WaterWatchers that will monitor your appliances for leaks and turn off the
water supply or device before too much damage is caused.

Learn more about choosing flood prevention devices for your home

4. Broken pipes

pipe-spraying

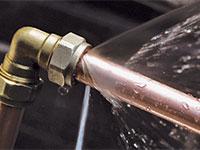
Depending on the size of the pipe and the size of the leak, a broken pipe has the potential to fill your home with water in minutes. As with almost everything, there are many reasons a pipe could break – frozen pipes burst, fittings spring a leak, the pipe gets damaged by homeowner activities, poor water quality wears down the material, and the list goes on.

Making sure you properly maintain your plumbing is the very best way to prevent water
damage from faulty pipes. Know where pipes are in your walls when decorating or remodeling, take care when digging in the yard, address problems with your water quality, and have your plumbing regularly inspected by a licensed plumber to make sure there are no problems.

You may still eventually have a problem, though, and it is good to be prepared in the event of an emergency. Make sure everyone in your home knows where the main water shut off valve is located and how to turn it off, and keep a few temporary repair items handy in case your plumber can’t get there immediately.

Learn more about temporary emergency pipe repair

5. Poor foundation

A poor foundation will definitely cause problems during a natural flood, but it can also cause flooding problems in areas that don’t have many natural floods. The foundation of your home is a concrete (ergo non-permeable) slab resting comfortably in the ground when the soil is fairly dry. When the ground becomes over-saturated during a big storm or the spring snow melt (even if the water doesn’t rise above ground), your foundation is essentially floating on top of all that groundwater. Water doesn’t compress – it will find its way through any nook or cranny it can – and if you have cracks or other flaws in your foundation, that water will end up in your foundation and possibly in the basement or ground floor of your home.

While it can be upsetting and scary just to think about your home flooding, it is often worse if it
actually happens. We encourage you to educate yourself on natural flood risks in your area and do what you can to protect your home and valuable possessions from water damage caused by
appliances and your home’s plumbing and drainage systems.

Have you experienced a flood in your home before?
Share your story in the comments below!

Make Saving Water Part of Your Back-To-School Routine

backtoschoolkids2

Any parent knows “back-to-school” is one of the most chaotic times of the whole year. You’re trying to establish new bedtime routines so everyone is up and ready on time in the mornings, battling the fall clothing migration as you store summer items and retrieve fall items only to realize that none of the school clothes your children could wear in May will fit them now, and getting everything relating to backpack organization, school lunches, and art supplies ready (which theoretically is supposed to make your life easier…hahahahaha…) – so we understand that water conservation really kind of takes a back burner during all of this. However, it really doesn’t have to, and since we strongly believe in teaching children good water-saving habits, we’ve compiled this list of five simple ways you can work water conservation into your new school year routine. Wanna know the best part? Many of these tips will also save you some money!

clock

1. Use a timer for showers. Not only will this help save water by limiting everyone to 10 minutes or less in the shower, it can also help you keep everyone focused and on time in the mornings. If you shower in the evening, having a timer can also help speed things along at bedtime. Replace your existing shower head with a water-saving shower head for more water savings.

2. Reuse your towels. When you get out of the shower, you’re clean right? Instead of tossing towels into the hamper after each use, hang them up to dry and use them again tomorrow. Buy robe hooks or re-purpose an old coat rack to hang in the bathroom and designate a hook for everyone. Even most younger children can hang a towel on a hook much more easily than trying to fold and hang over a traditional bar, and it keeps the bathroom more organized and looking nicer than having a bunch of skewed, bunched up towels half hanging off the towel bars.

3. Be mindful of your other laundry. Some days you have to try on everything in your closet before you figure out what you really want to wear…or that you and your tween daughter both agree is appropriate for school…But are all those clothes dirty? Of course not! What about those jeans you wore yesterday? They could probably be worn again before needing to be washed. When undressing, evaluate what is actually dirty and what could be worn again before being washed, and you could save not only tons of water but lots of time and energy by doing less laundry. And who doesn’t want to do LESS laundry??? When you actually do laundry, also remember to set the appropriate load size and try to use cold water or try line drying to save more energy and water.

4. Encourage healthy eating and drinking water. We’re sure you do this for your kids already, but did you know that by eating fresh foods and drinking water you’re actually helping to save water and energy? glassofwater Generally, it takes a lot more water to produce processed foods than it does to actually grow fresh foods. Additionally, purchasing locally grown fresh fruits, vegetables, nuts, eggs, cheese, etc. cuts back on the amount of water needed to transport foods. We understand that not all towns or cities have a local farmers’ market and that sometimes this can be cost prohibitive, but it’s a choice worth considering and with careful planning and budgeting can be a positive, healthy change for your family. Another quick healthy tip that can potentially save you hundreds of gallons of water per year is to put a pitcher of water in the fridge for drinking instead of waiting for the tap to run cool. With this method, you can also add fresh fruits like strawberries, limes, or pineapple to infuse flavor in the water to help encourage kids to reach for a glass of water instead of sugary juices or sodas.

5. Consider the water footprint of products you use every day and try to make some changes. It’s a complex system, but water and energy are very closely tied together and it is sometimes difficult to understand how much water is really used to make the things we use all the time. Wherever you can, find ways to reuse or recycle things, or to create your own reusable items. Cloth shopping bags, reusable lunch baggies or containers, and reusable water bottles can replace their single-use alternatives to help save water. Now, we hear you saying – but doesn’t it take water to create and wash those too? Yes, it does, but the water consumed in creating and washing these reusable items is significantly less than what is wasted to create new single-use items. It’s estimated that it takes about 24 gallons of water to make one pound of plastic. Even if you buy a plastic reusable water bottle, you’re still helping to save water since that 24 gallons only has to be expended once instead of every single time you need water on the go.

If we focus only on one thing – packing lunches for school – think of all the ways you can save water…

savewaterschoollunch2

By making simple changes in our daily routines and making a concentrated effort to really think about how we use water, we can all start saving this most precious of resources. And although it might seem difficult at times, remember that every drop counts! Your small changes DO make a BIG difference!

Want to learn more about saving water around the house and find water-saving innovations to help you out? Check out our Guide to Water-Saving Plumbing Products.